How to configure Android for POP/IMAP Email Accounts?
01. If this is the first account you’re setting up on the Android device, tap Mail. Otherwise, from the Home screen choose “Mail > Menu > More > New Account…”
02. By tapping the option at the bottom of the list, set the account type as “Other (POP3/IMAP)” and select “Manual Setup”
03. Then input the following information: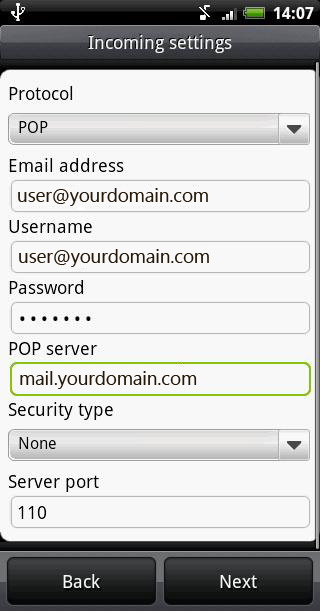
* Kindly note that for POP account the server port is 110, as for IMAP the server port number is 143
04. Then click next.
05. Then input the following information: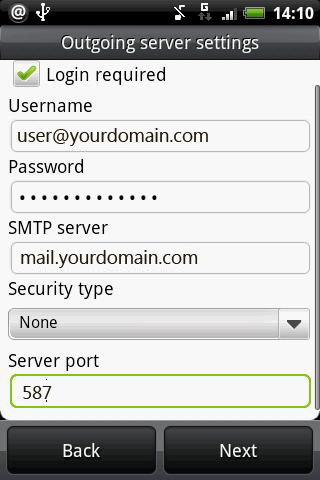
06. Click next and then save your details.
07. Your mail account is now ready for use.
Related Articles
Setting Up Outlook 2013 Using POP
Adding a new account Select the File menu and choose Info Click the Add Account button. Choose Manual setup or additional server types Click Next. Choose POP or IMAP. Click Next. Account Settings User Information In the Your Name box, enter the name ...Setting Up iOS 7 Using IMAP
From the home screen, tap Settings On the Settings screen, tap Mail, Contacts, Calendars Tap Add Account Tap Other Under the Mail subheading, tap Add Mail Account Complete the following fields: Name – The name that will be displayed when emailing ...Extract email header Ms Outlook 2013
Open the email with the headers you need to see. Select the Files tab in the email's window. Click on the Properties button. You'll get the "Properties" dialog box. In the "Internet Headers" field you'll see all information about the message.How to extract email header in Outlook 2007?
In Outlook 2007 you can view the headers without opening the message. Just right click on the email message in your Inbox and choose Message Options. This will show you the headers. Or you can open the email message. You can open the email message by ...How to configure account in ThunderBird?
1. Open Thunderbird. 2. Click the 'Tools' menu, and select 'Accounts Settings' 3. Click the Account Actions button. 4. Click Add Mail Account. 5. Enter your name as you would like it to appear on your outgoing mail messages. 6. Click your E-mail ...